Showing posts with label foundation. Show all posts

8.01.2012

Basement Floor

Gah...It's been an age since I last posted. I've changed jobs, Shawn's changed jobs twice, and just last month we got married (whoot!)  But as much as our daily lives have changed, the home improvement has been rather moderate.

The major one was replacing the roof.  This before picture shows the two different types of roofing that we had up there.


The original house (near in the pic) had corrugated metal roofing over top of cedar shingles.  The 'new' part (far left in the pic) had layers of shingles.  Shawn did the shingled part first in the fall of 2010.  In order to avoid exposing the whole layer of sheathing to the elements, he did it in sections.


 When this was completed, Shawn worked as a long-haul truck driver for about a year.  Which sucked because a) I missed him, b) nothing major got done on the house, and c) I missed him.  Now he drives locally for a nearby business and he's home every night.  Yay!  So...

The original portion of the house was re-roofed in May of 2012.  Under the old corrugated metal roofing was the original roofing material: cedar shingles.  And after years of living under the metal they were dry, dry, dry--that is, a fire hazard.  Not so yay.  Here's the process:


 First, the cedar shingles, then the bare bones, and third, the new sheathing.  Here's the nearly final product:


I'd go out and get a completed shot but it's raining just now.  But comparing even this to the image in the header of this blog makes my heart go pitter-patter.  Now, back to the basement:


We've hired a guy to pour our four inch thick concrete basement floor.  Yes, that's right.  We've hired someone who doesn't live here.  Reason being: no single person can put a smooth finish on a nearly 900 sq. ft surface faster than the concrete can dry.  It takes a team.  Furthermore, it takes an experienced team where everyone knows his job and can get it right the first time and fast.  (So, not me.)

What we have done is place thick (6mil) plastic sheeting down as a vapor barrier (it'll be forever covered by the concrete) and installed three drains that run out to the french drain which runs out to our sump well and a backup dry well. 

 Because, why not?  Shawn's done everything to prevent water in the basement including waterproofing the concrete block, grading the yard, running gutters, digging a dry well, and installing a french drain.  But just in case of torrential weather some year, it's cheaper to install these drains and never need them than to buy flood insurance.  

So, now we wait for our floor guy.  In the meantime, some smaller fun things are happening inside!


10.05.2009

Stink Party!

You guys missed a great party on Saturday. We invited my mom over and we painted vile-smelling waterproofing over the new walls. Oh, it was a good time... you don't even know.

Actually, we have made a lot of progress since late September. Shawn built up all the exterior walls on the new footer (see diagram--the yellow is the finished footer, the red is the finished wall.) Then this past weekend we waterproofed all the exterior surfaces that were still exposed. So anything that's grey in the following pictures is new--and now black.

Taking out the I-beams is a bit by bit process. First, the blocks the house is sitting on have to be dry enough to hold the house (naturally), the the I-beams come out one at a time and we fill the holes they came from with a few more blocks.

9.21.2009

Second Third of Footers

Two (big) thirds of the footers are finished. In the above diagram, the yellow represents the first 'third' we poured and the purple is what we did last Wednesday. The thin red line shows where our new walls are, and Shawn's down there as I type building the walls up on the purple footers. The light blue footers will be our last, as well as the easiest with a simple U shape. The pour went better this time than last. At least the mixer didn't get stuck in the mud!! (Click here and here to see videos of the last time we poured.)
This is a pretty cool shot of how the house is being supported. If you notice that the sill supporting the wall is bowed heavily in the middle, don't worry. I'm just a poor photo editor.

The supports don't always work out quite as well as we like, which is scary, but...eh... we lived. The left side of this one is a bit taller, or lower, rather. We had them both dug down as deep as the one on the right, but when we dug alongside it for our footer trench we had an accident. It started to collapse. So we lost several hours but were able to secure it. The house didn't cave in.

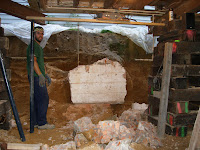
I guess we were misguided by the heavy clay content of the soil this far down (about 8 feet below ground.) Most of our dirt is silty sandy stuff, but we found a few areas that had a good 3-4 inch deep layer of pinkish, purplish clay. Very pretty but a pain to dig.

But dig it we must! Here Shawn's digging for rebar that he hammered horizontally into the dirt during the last pour. About 5 feet of the bars are in the previous footer and 5 feet are in the new one.


When you pour a footer is sections, the places they meet are called 'cold joints' and require these bars as extra reinforcement because these cold joints are the areas most susceptible to cracking over time.


The cement blocks are helping maintain the 24 inch width required as we set up the forms. Once the forms are nailed together and spreaders put on top, the blocks will be removed. Spreaders are just 2x4s long enough to bridge the gap and hold the forms the correct distance apart during the pour.


For this pour, Shawn made two chutes that the truck's chute could easily move between. This helped get the concrete spread out as it came in, a.k.a. less work for us.

Here's the end of one chute, just after the pour. Allowing for overflow is very important. We can always toss out the excess, but if we order too little.... oh, snap...


All done! This concrete has been poured and 'screeded' (leveled out by having a 2x4 dragged across it.) This is a cold joint, so the rebar is deep down in it. All that's left is to remove that spreader on top, let it dry (see the color change?) and the building can begin. We took the weekend to enjoy company and relax and this morning Shawn started the new walls.

9.07.2009

Death to the Old Foundation!

We're finally (finally! finally!) finished bashing down all the old concrete and dragging it out back. We have a big pile of rubble now, if anyone knows anyone who wants rubble. (We might know one guy, actually.) While most of the foundation was a simple two-foot deep red brick setup (very bad after a century without gutters), and part of it was crawl space, somebody had retrofitted at least a portion of the crawl space under the house with a basement of poured concrete walls. It was in very bad shape though and had to go. Smashy smashy!


We've dug out nearly all we need to below the sills so the front left third of the house is floating on its cribs and I-beams above the site.


Before:


After:


That's a lot of dirt!

For our next trick, we'll dig out the trenches that the foundation footer will be poured into. We hope to have the cement truck here and do the pour on the 14th. Depends on the rain... Here's the plan (pictures were taken around June 6 when we did the pour for the back third of the house.)

8.29.2009

Lifting the House...sort of.

It came!!! My new USB connector for the digital camera! Yay! So I can finally post all my pictures of what's been going on at the house for the last month and a half. Basically...lots. We're deep enough into the demolition and digging that we've taken security precautions.

I have a deep fear of a neighbor falling into the hole...some of our neighbors have questionable standards of living/safety...

Since finishing the sills about a month ago, we've been digging out the area under the dining room and living room and Shawn's built up the cribbing to hold the I-beams in place. Here are some pictures of our digging progress for the past few weeks. The cribs are built from railroad ties (3 foot - 4 foot sections) and the I-beams are being "rented" from a salvage yard near Greenwood. We bought them but intend on selling them back for about 80% of the cost.


This process seems to be the standard method of house-lifting out there. The folks at Geekazon used it, as did Brothers Builders in Ontario. It was recommended, of course, by our hero, George Nash, and done by the Hinton family in the wonderful documentary Moving Midway. What the Hinton's did was much more complex, as they were transporting a 155 year old preservation-quality plantation house to a new location, while we're justing holding a 105 year old busted farmhouse in the air to build under it. But the concept remains the same. I never would have guessed....
Shawn also had to bust up and remove our front 'porch,' a piece of poured concrete about 2 feet thick. This was done mostly while I was at inservice days and during my first week of school.


We may be able to do our second footer pour next weekend, depending on how bad the rainy season and when we can get the cement truck to visit. We'll see.

8.07.2009

Heigh-ho! Digging....again.


"We dig, dig, dig, dig, dig, dig, dig in a mine the whole day through!
To dig, dig, dig, dig, dig, dig, dig is what we like to do."


Yes, it's that time again. Time to dig... and dig... and dig. I can hear Shawn picking away underneath me as I write. He got a nail in his foot early last week, poor guy, so we "pre-poned" this week's trip to Venango County, PA. We went last weekend to spend time with his family. (Hi, all!)

We came back early this week, took a little time off for the foot, and now we're back to digging. I'm still in the unfortunate camera situation of not having a USB cord, but I finally broke down and ebayed one for just under $3. I'll have more pictures up soon, I promise.

I also think I should buy my own digital camera (like a big girl) and stop borrowing my mama's. This month's Consumer Reports speaks very well of a $130-$150 Canon A1000. The price looked right so I froogled it... Wouldn'tcha know, all the better priced models were sold out. Guess I'm not the only person who does whatever C.R. tells me to.

Here are some early digging photos though so you have an idea of where we are:


If you stood in the spot the photographer is in today, it would be terribly uncomfortable because you'd be trapped in concrete blocks and your left side would be covered in gravel and dirt. But it should give some idea. We dug the open space out back in March, and are now digging out what's dead ahead of the viewer. The first two I-beams in this picture are gone. The house now rests on the new concrete block wall. We still have the beams, though, and we'll use them again very soon.

Once we run out of things to dig...

7.26.2009

How to Replace Sills (Part 1 of ?)

Horrid news to report... We’ve been having problems with the digital camera. Somewhere between Mom’s and our house the connector cord has vanished. So there are some great pictures on it even now, but I can’t show them to you. Sigh...

Fortunately, the sills we replaced last week are for the second two-thirds of the house. So I have pictures of the ones we did back in March/April and the process is the same.

While some of this came from our favorite book, a lot was Shawn’s own invention. (He’s humble; he says he probably saw a picture somewhere.) If you recall our drawing of a balloon frame, you’ll remember that the foundation supports everything. But our foundation is crap, so that doesn’t help us. The sills support everything except the foundation. But replacing the sills is what this is all about, so that doesn’t help either. The wall studs support everything except the foundation and sills. Bingo! So how do you support and lift all the studs on a house but leave the sill just dangling loosely so it can be removed and replaced?

2 x 12s (or 2 x 10s) and bolts!

First we removed enough of the siding to expose the studs from about two feet above the sills on down. Then Shawn screwed two 2 x 12s horizontally against the studs. Next, he bolted them into the studs (two 8 inch, ½ inch wide wood bolts per stud). Those little chunks of lopsided wood just take up a bit of space and work as a washer. We didn’t want the bolt going through our interior drywall, which was still up in some areas.

Now, these bolted on 2 x 12s should do the job of a sill—if we lift it, all the studs will arise evenly and in unison. So, how do you lift this without touching the sill? Screw jacks!

We own two hydraulic jacks, which are on either end. They’re wonderful, but expensive. So we rented several screw jacks (an older, heavier, more cumbersome invention) from the Dover Rent-All. We’re the only people who have rented these in years, apparently. We placed a railroad tie on the ground right next to the old foundation then used the two hydraulic jacks simultaneously to lift the 2x12s. We placed the screw jack underneath in the middle to hold the 2 x 12s in placed, removed our hydraulic jacks and repeated several times over the length of the sill.

We did have to break down and use the car jack occasionally.

Check out that space between the stud and the foundation!

Now we just slide out the old sill and pop in the new one. Easy, right? Right...