8.29.2009

Lifting the House...sort of.

It came!!! My new USB connector for the digital camera! Yay! So I can finally post all my pictures of what's been going on at the house for the last month and a half. Basically...lots. We're deep enough into the demolition and digging that we've taken security precautions.

I have a deep fear of a neighbor falling into the hole...some of our neighbors have questionable standards of living/safety...

Since finishing the sills about a month ago, we've been digging out the area under the dining room and living room and Shawn's built up the cribbing to hold the I-beams in place. Here are some pictures of our digging progress for the past few weeks. The cribs are built from railroad ties (3 foot - 4 foot sections) and the I-beams are being "rented" from a salvage yard near Greenwood. We bought them but intend on selling them back for about 80% of the cost.


This process seems to be the standard method of house-lifting out there. The folks at Geekazon used it, as did Brothers Builders in Ontario. It was recommended, of course, by our hero, George Nash, and done by the Hinton family in the wonderful documentary Moving Midway. What the Hinton's did was much more complex, as they were transporting a 155 year old preservation-quality plantation house to a new location, while we're justing holding a 105 year old busted farmhouse in the air to build under it. But the concept remains the same. I never would have guessed....
Shawn also had to bust up and remove our front 'porch,' a piece of poured concrete about 2 feet thick. This was done mostly while I was at inservice days and during my first week of school.


We may be able to do our second footer pour next weekend, depending on how bad the rainy season and when we can get the cement truck to visit. We'll see.

8.13.2009

Style

We’re still digging and I’m still waiting for a USB cord for the camera. Ergo, I have no news to report and frankly, digging is very boring.

So, I’ve started thinking ahead. Lately, I’ve been considering the style of the house. Most homes have a known style (Cape Cod, Ranch, Queen Anne, Bungalow) and I’d really like to give our house a uniformity of style itself. I’ve never been in favor of trying to be something you ain’t, so as much as I love Frank Lloyd Wright I will not try to convince anyone that my house is Fallingwater.

I explored the interweb and found a wonderful resource by Dr. Tom Paradis, an associate professor at Northern Arizona University, who says I may use his pictures as long as I tell you that they’re his. So, thank you Dr. P., creator of http://jan.ucc.nau.edu/~twp/architecture/

I started my research knowing that this house was built in 1905 as a simple two-room, two-story structure. I knew that the outside walls that end in ‘points’ on top are called the ‘gable walls’. I knew we now had an L-shaped design. I knew that in 1905, my area was a tiny farm town known for simple country folk, not stylish modern architecture. And I knew from neighbors that some previous folks living here had done things like growing gardens and painting the house and the garage/barn the same garish cranberry color inside and out. I decided to only strongly consider those styles that were popular way before 1905 up through maybe 1910. I figured whatever I found, ours would be a simplistic version—not state of the art.

I finished my research having learned that the ‘pointiness’ of gable walls is a big factor in classifying American styles. Also, adding a lot of multi-dimensional stuff significantly changes the style. Here’s our house:


What is now the right half of the house used to be the whole house. There’s a gable wall around the corner of the right side and the used to be (of course) a gable wall around the left side. I suspect this is based on the Early Colonial style, which is actually no style at all. Folks simply built a shelter whether in Virginia in the 1700s or Oklahoma in the 1800s. While this house was built in 1905, it doesn’t appear to have been designed by anyone desiring more than a roofs and four walls.


In later colonial periods (when America had more cash for its government buildings, and Americans had more cash for their homes), some of these other familiar styles popped up among the stylish. The Federal Style (1780-1850) and Greek Revival (1800-1855) are very similar and noted for their columns and wide gable front pieces. (Think of the Parthenon, Lincoln Memorial, NY Public Library, College of William & Mary.) The other major revival in American architecture was the Gothic revival (1840-1880). These buildings are known for their “Steeply pitched roof” and arches (think church steeples, medieval cathedrals, Chicago’s Tribune Tower.)

Both Greek and Gothic are stately and beautiful, and neither resembles our home, mostly because both rely heavily on their gables (low vs. steep) for their style. Our gables are medium and simple—'farmhousy'. So, I continued my search.

The Victorian era boasts a greater variety of styles than I had thought. The Victorian house that popped into your head just now is probably a Queen Anne (1880s-1905.) Often, when a town is described as having many “quaint Victorian houses,” it means Queen Annes which are known for their many different roofs, dormers, porches, gables, even a turret or two. Another distinct Victorian style is the Second Empire (1860s-1880s) known for its Mansard roof. This is a roof unlike any other: it has a flat top, like the Italian style, but the uppermost floor of the house has exterior walls that lean slightly inward and are covered in roofing materials, not siding. It’s very odd.

At this point in my journey, I had reached the 20th century and still no style for my little house! I know it’s not the product of a single architect sitting down at his drawing board and creating a piece of art. It’s a mish-mosh of skilled and unskilled additions and “improvements” from 1905 to today! How could I possibly give it any kind of uniformity? But, you know, just because a house isn’t the work of a real architect, doesn’t mean it’s style-less. Here is Dr. Paradis’s narrative on what was happening from town to town from 1880-1910:

The spread of Folk Victorian (and other late 19th century styles) was made possible by railroads expanding into smaller towns and cities. Mass-produced wood features could be transported quickly and cheaply almost anywhere. Home builders often simply added trim and ornament to traditional folk houses. Older folk homes were often updated with new ornamentation, now available everywhere due to pattern books and mass production and sale of wood features. A very common style found in turn-of-the-century western towns settled during that time.”

No, Delaware isn’t out west, but here’s something that actually made sense. These were homes built while Victorian houses were the fashion by homeowners who didn’t have the carpentry skills or the money to really go all Queen-Anne-Mansard-bling on it. So they improvised. These are the ‘Folk Victorians’: often L-shaped, with three gable ends, possibly a porch or two (or not), and whatever little Victorian details and trim could be squeezed in. Ours doesn’t have the detail work that the following two examples do, but the potential is definitely there.

Welcome to our Busted Folk Victorian Farmhouse!

For more insight visit Dr. Paradis’s site (all pictures except the very first one are his. Nearly all wisdom is as well.)

Also, check out Dave Taylor’s Victorian house site for more styles, details, and cool pictures.

8.07.2009

Heigh-ho! Digging....again.


"We dig, dig, dig, dig, dig, dig, dig in a mine the whole day through!
To dig, dig, dig, dig, dig, dig, dig is what we like to do."


Yes, it's that time again. Time to dig... and dig... and dig. I can hear Shawn picking away underneath me as I write. He got a nail in his foot early last week, poor guy, so we "pre-poned" this week's trip to Venango County, PA. We went last weekend to spend time with his family. (Hi, all!)

We came back early this week, took a little time off for the foot, and now we're back to digging. I'm still in the unfortunate camera situation of not having a USB cord, but I finally broke down and ebayed one for just under $3. I'll have more pictures up soon, I promise.

I also think I should buy my own digital camera (like a big girl) and stop borrowing my mama's. This month's Consumer Reports speaks very well of a $130-$150 Canon A1000. The price looked right so I froogled it... Wouldn'tcha know, all the better priced models were sold out. Guess I'm not the only person who does whatever C.R. tells me to.

Here are some early digging photos though so you have an idea of where we are:


If you stood in the spot the photographer is in today, it would be terribly uncomfortable because you'd be trapped in concrete blocks and your left side would be covered in gravel and dirt. But it should give some idea. We dug the open space out back in March, and are now digging out what's dead ahead of the viewer. The first two I-beams in this picture are gone. The house now rests on the new concrete block wall. We still have the beams, though, and we'll use them again very soon.

Once we run out of things to dig...

7.26.2009

How to Replace Sills (Part 1 of ?)

Horrid news to report... We’ve been having problems with the digital camera. Somewhere between Mom’s and our house the connector cord has vanished. So there are some great pictures on it even now, but I can’t show them to you. Sigh...

Fortunately, the sills we replaced last week are for the second two-thirds of the house. So I have pictures of the ones we did back in March/April and the process is the same.

While some of this came from our favorite book, a lot was Shawn’s own invention. (He’s humble; he says he probably saw a picture somewhere.) If you recall our drawing of a balloon frame, you’ll remember that the foundation supports everything. But our foundation is crap, so that doesn’t help us. The sills support everything except the foundation. But replacing the sills is what this is all about, so that doesn’t help either. The wall studs support everything except the foundation and sills. Bingo! So how do you support and lift all the studs on a house but leave the sill just dangling loosely so it can be removed and replaced?

2 x 12s (or 2 x 10s) and bolts!

First we removed enough of the siding to expose the studs from about two feet above the sills on down. Then Shawn screwed two 2 x 12s horizontally against the studs. Next, he bolted them into the studs (two 8 inch, ½ inch wide wood bolts per stud). Those little chunks of lopsided wood just take up a bit of space and work as a washer. We didn’t want the bolt going through our interior drywall, which was still up in some areas.

Now, these bolted on 2 x 12s should do the job of a sill—if we lift it, all the studs will arise evenly and in unison. So, how do you lift this without touching the sill? Screw jacks!

We own two hydraulic jacks, which are on either end. They’re wonderful, but expensive. So we rented several screw jacks (an older, heavier, more cumbersome invention) from the Dover Rent-All. We’re the only people who have rented these in years, apparently. We placed a railroad tie on the ground right next to the old foundation then used the two hydraulic jacks simultaneously to lift the 2x12s. We placed the screw jack underneath in the middle to hold the 2 x 12s in placed, removed our hydraulic jacks and repeated several times over the length of the sill.

We did have to break down and use the car jack occasionally.

Check out that space between the stud and the foundation!

Now we just slide out the old sill and pop in the new one. Easy, right? Right...

7.23.2009

NEW SILLS!


Today was a day of glory!!! Our house has all new sills! Yay!

We put in eight this week and I haven't been able to post, but I'll put up pictures this weekend. Tomorrow shall be a day of rejoicing and celebration at the Delaware State Fair (I'm gonna pet the baby goats!) and... a secret surprise for my awesome builder at the Grandstand at 8:oo pm. That's enough info for anyone who cares to Google it.

Most of the advice for our work came from George Nash, author of Renovating Old Houses. Besides the construction advice (400 glorious pages of it) comes this piece of personal advice that I think is fantastic:

"Remember that the house is a means, not the end. There are times when you should put the hammer down, say “to hell with it” and go out to dinner. Listen to your partner. Keep your sense of humor well oiled. Listen to yourself, know when you need to stop. And stop. Do not ignore this advice. There is nothing sadder than a house that has devoured the souls of its people, or than the emptiness of waking up at night and seeing a stranger lying beside you.”

A little foreboding, I know. But his frank acknowledgement of the emtional aspects that come with doing the kind of work we're doing is actually reassuring. Sanity can prevail! Huzzah! Baby goats! Huzzah! Okay...clearly, my mind is not on the project anymore this week, so...

Have a great weekend!
(Not my goat. This fine, fine goat lives in Bridgeville, DE and likes to come to the fair. www.delwareboergoats.com)

7.16.2009

Siding...


Yesterday, I talked a little bit about siding. Well, oddly enough, the subject came up quite a bit today when two unrelated visitors stopped by the check us out. We're on a pretty busy road, so we actually get a lot of notice from folks, mostly guys who have done similar work, driving by and wondering what our plans are.

First, our neighbor from through the back field (Hi, Mr. Murray!) stopped by. He's known a few of the folks who have lived in our house over the years and often has some insights on the "repairs" they had done before. Apparently, the whole house used to be a cranberry color that we can still see in some patches on our shed. We showed him some of our ripped up cranberry painted flooring and mentioned that the color had been inside too. Someone must have loved it! We chatted siding (as yesterday's pictures showed, we had to remove some from around the bottom to do our work) and he asked if we planned on keeping up the old farmhouse look with the original wood plank siding.


As much as I like the look of wood plank siding, as you can see the house only has that on some walls. Elsewhere it has asbestos shingles. Asbestos, you're probably aware, is kind of a dirty word. However, there IS a difference between working with and inhaling asbestos 40 hrs a week versus living next to stable asbestos shingle that don't break, crack, or dust up the place. Just like there' s a difference between living at the bottom of the ocean versus living on the beach. One will kill you, the other ain't so bad (my dad's metaphor.) We told our neighbor that while we hadn't decided, we were pretty sure that eventually ALL the siding would go and we'd get something new. (By the way, ALL the foliage touching the house in that picture is g.o.n.e. Yay!)

Later this afternoon, a guy who lives in Harrington (20 miles south) and occasionally drives by stopped in. Guess what he wanted to ask us about? Siding! Apparently, he had some asbestos shingles from his own home and was wondering if we could use them, seeing as we were doing construction and already had them up over 60-70% of the house. We said 'no, thanks' and shared our strip-it-redo-it plan and then asked how exactly he had removed his own siding. We had heard that since asbestos causes cancer (just like nickel, talc, the sun, sawdust, diet coke, vinyl, glass...), we would need to pay some certified dudes thousands of dollars to remove it. Not so, said our new best friend. Apparently, if you are the homeowner, and you follow very specific (but totally doable) instructions that he has at home and could drop by, you are allowed to remove them, wrap them, and dispose of them at the local dump. Yay!

My dad says it's like having a lawyer: you can pay a pro or do it yourself legally, but you can't pay a non-pro. So we could pay the pros or take these down ourselves for a teeny fraction of the cost. With what we're saving, we can afford to wear dust masks...


Inspired, I flipped through my issues of House Beautiful to find the examples of siding on Newell Turner's Twilight Field. And there it was! May '08! He used board-and-batten vinyl siding from CertainTeed. The same fine folks whose insulation is in our walls! Of course, squirrels made nests in the insulation which attracted a snake who we've caught and released at least half-a-dozen times, but that's another story for another day...


7.15.2009

Dude...Where's my wall?


Poof! No more siding! Well, not 'poof' exactly. It actually involved a crowbar, sawzall, shovel, and other nasty implements. But it had to be done. You may notice the siding is different: the front of the house (with my mama standing in front, above, and the first pic below) has asbestos shingles; the side of the house (that Shawn was ripping down in the second picture below) has what we believe was original wood siding. The asbestos shingles we're keeping to place back over the completed wall.


Also, in that picture above of the original wood siding Shawn's removing, you may notice a grey concrete foundation. Look carefully in Shawn's shadow. It's not a concrete foundation, it's a 1-2 foot deep brick foundation with a 1/4-1/2 inch thick layer of concrete "painted" (like stucco) over it. W. T. F....?

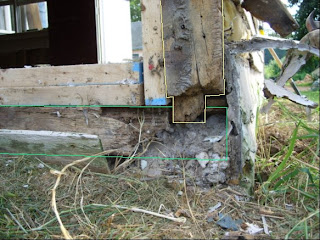
While I have many complaints with the people who tried to fix the house up over the years (many....), I'd like to take a moment to point out some rather impressive original work. Take a look at the following picture.


At this point (after a century of hard work by termites, mold, and other forces of nature), it's a little hard to find the beauty in this. The sill, is outlined in green, and the corner stud in yellow. That oak sill was shaped with an ax (we could still see the marks) and the corner stud had a square knob hand carved into its base. The sill had a corresponding notch cut into it so the two pieces would fit firmly together. Can you imagine doing all that work?

Speaking of work, today we began to talk about siding. This asbestos can't stick around forever and, let's face it, the formerly nice wood siding is crap. Right now, I'm loving Newell Turner's siding on Twilight Field. It's vinyl (super easy to care for) and the look of vertical lines gives it a real farmhouse look. Well, we'll see. We have plenty of other work to do first. :-)